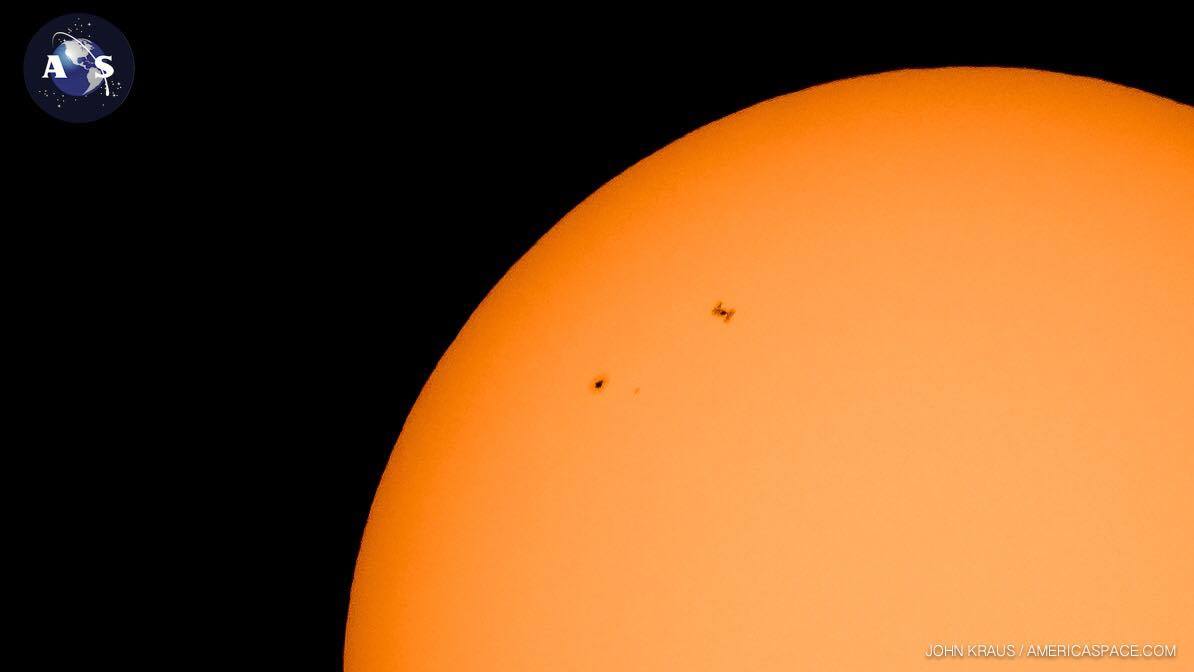
Many have seen the International Space Station glide across the dark sky in the hours after sunset or before sunrise while it is still lit by the sun. For most locations, visible passes occur at least every few days and sometimes more than once per night. Several years ago, some clever folks at www.transit-finder.com created a way that anyone can enter their location and find a place near them where the ISS would appear to fly directly in front of the sun or the moon. When such a “transit” occurs, the path of visibility is very narrow…only a few miles at most. The timing is also very critical…orbiting at over 17,000 miles per hour, the ISS usually takes only one second or less to cross the moon or the sun. Attempting to photograph a transit can be done with minimal equipment and is a brilliant way to demonstrate the science of orbital mechanics.
The Transit-Finder web site allows one to specify how far from their home they are willing to go to photograph a transit. It shows the path of visibility on a map or satellite view with the ability to zoom and move around to find a good location to set up. Try to pick a location in the center of the path for a transit that will cross over the center of the moon or sun and for the longest transit time. A hundred yards either way makes a definite difference, so be picky about your location. The data at the web site is updated frequently due to small changes in the orbital path and altitude of the ISS, so check before you go to your chosen site to be sure than nothing has changed. I found that over the course of an afternoon the prime location for my and my partner’s latest attempt changed by about fifty yards and the time changed by one-tenth of a second.
A telescope is not required if you have a lens with a long enough focal length to make the moon or sun occupy at least half of your field of view. Obviously, for the sun, a solar filter will be required. Generally, the apparent size of the ISS will be around one arc-minute, so it will appear to be about one thirtieth of the diameter of the moon/sun. If your imaging scale is such that you have a small image of the moon/sun, then the ISS may not clearly be distinguishable. A 2X tele-converter may be helpful to increase your total focal length. For a DSLR that uses a crop-frame sensor (most consumer models), a focal length between 600 and 1000 mm would be desirable. For a full frame DSLR, a bit longer focal length is required. A small refracting or Schmidt-Cassagrain telescope of the proper focal length is ideal for this.
A tracking mount is nice to keep the moon in the field of view as the transit time approaches, but is not absolutely required. The transit will occur in around one second, so a tripod is OK as long as the moon is centered in the field of view just before transit time.
You have two ways to capture a transit…either by shooting a single frame at just the right time (very difficult), a series of quick frames in rapid-fire fashion as the transit occurs, or by simply shooting video. If shooting a single frame or a quick series, using shutter lock-up if your camera has it along with a remote shutter released cable will reduce vibration induced jitter. Video can be captured with a true video camera, or even better with one of the newer DSLR’s that can shoot HD video. In any case, test your exposure on the moon or sun well before the transit so that you have a well exposed image without any overexposure. The ISS will appear as a black shape against the moon or sun, so good contrast in the capture makes for an easier image to process for presentation. You will want to choose a low ISO to keep noise down and as fast a shutter speed as you can without underexposing. The ISS is moving FAST, so you don’t want to blur your image of it with a slow shutter speed.
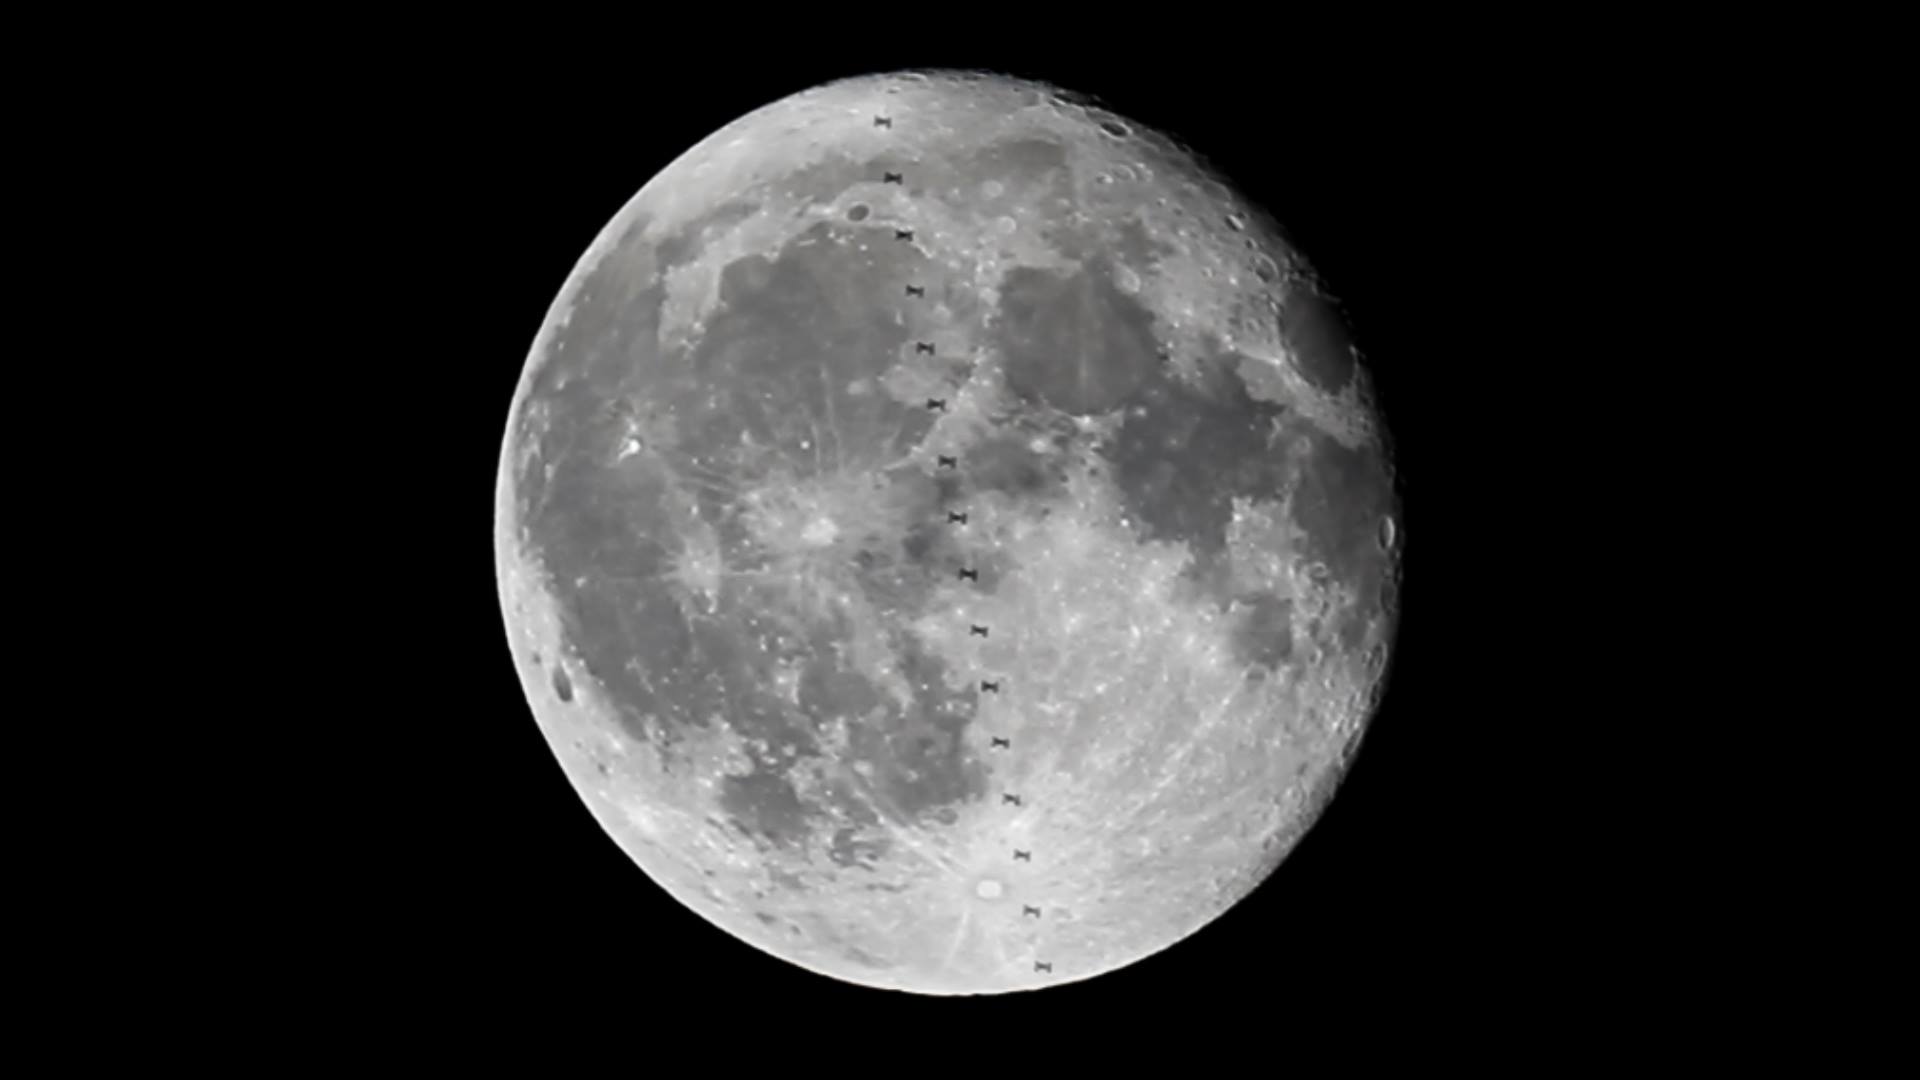
This brings up an issue for video capture. Videographers will tell you to set the shutter speed to one half of your frame rate. In other words, if you are shooting at 30 frames per second, your shutter speed should be one sixtieth of a second. This gives a “film look” where motion is slightly blurred from frame to frame. Many video cameras automatically set this for you. However, for shooting ISS transits where the target is moving VERY fast, we want to use as fast a shutter speed for each frame as proper exposure will allow. We want a series of sharply exposed stills, rather than a motion blurred movie-like video. At a typical HD video setting of 1080P, the frame rate will be 30 fps, so you should get close to 30 still images of the ISS passing over various parts of the moon or sun. In the case of the image with this article, the shutter speed was set to 1/400th of a second. This was at an ISO of 100 and captured through a small f/7 telescope. The moon and sun are bright, so fast shutter speeds should be no problem.
If you capture video, slow it down in editing software so that for presentation the pass is considerably longer than real time. Another option is to make a collage of the frames such as the image with this article to show the transit path. To composite this image, every other frame (16 out of 32) was chosen and assigned to different layers in Photoshop. Then the layers were combined using the “Darken” method so that the dark image of the ISS shows through from each frame.
Capturing ISS transits adds another tool to your photographic arsenal and allows one to see the actual shape of the space station rather than just seeing a bright “star” passing occasionally overhead.
.
FOLLOW AmericaSpace on Facebook!
.